0
comments
0
comments
Have you ever dreamed of a frozen dessert that can actually boost the immunity? An Ice-cream that's creamy yet healthy?A sweet snack that even a diabetic is allowed to eat?A frozen treat that's free of gluten,artificial colors ,hydrogenated oils and high sugar syrups? Rachel Albert-Matesz's Ice Dream Cookbook is the answer to those dreams,the book brings definite good news for all the Ice-cream enthusiasts ,Coconut lovers and those on restricted diets(gluten-free,dairy-free,low-sugar).Her book reveals enticing healthier alternatives for making a perfect scoop of Ice Dream.

Rachel Albert-Matesz grew up eating a typical American Diet of refined and overly processed foods,fries and ketchup were her serving of vegetables.The nickname Betty baker (as in Betty Crocker) best suited her for her obsession with sweet baked goodies.The nutrition deficient diet eventually took the toll on her health with conditions like hypoglycemic episodes,cavities,acne,brittle nails,painful constipation,depression,mood swings,painful menstrual periods and a weight problem.In her quest for good health she discovered natural alternatives for a healthier diet,with keen desire to help other she became the "healthy cooking coach".Learn more about her story at TheHealthyCookingCoach.com.
She took the Challenge of creating a nutritious ice-cream with better all-natural ingredients.Her book Ice Dream Cookbook is the sweet success of endless testing and tasting.The cookbook has 80 delicious and healthy recipes with more than 200 Variations.The book discusses the essentials of incorporating healthy ingredients and provides alternatives to the common food allergens such as dairy,nuts,soy and wheat(gluten).The Coconut milk and virgin pressed Coconut oil is highlighted as the healthier substitutes for the fatty dairy cream and butter.She uses non-caloric herbal sweetener stevia along with other natural sweeteners like Agave nectar ,honey and maple syrup.In this way She cut the amount of sugar but maintained a similarly satisfying level of sweetness and lessen the health hazards of sugar at the same time. The book also has useful guidelines for equipments and techniques needed for whipping up the best tasting Ice Dream.
Rachel has created a whole range of flavors ,from basic like Vanilla ,Chocolate chip,Maple Pecan and Orange cream Ice Dream to beyond basic flavors like Avocado,Basil,Ginger,Lemon cookie crumble and Peppermint.Coffee and tea also have a place in these delectable dessert.My favorite pick had to the fruit and nut flavored.
There is also a chapter each on variety of sauces(fruity,chocolate and more) ,compotes and gluten-free cookies to go with the Ice dreams.
Roasted Banana Nut Ice Dream with Blueberry Sauce
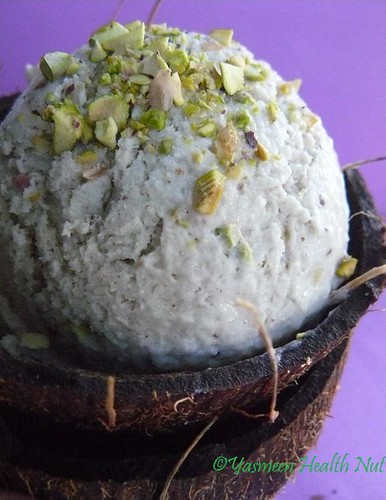
I was truly elated when Rachel sent me a copy for review.With summer at its peak,this book couldn't have come at a better time.This book also reaffirms my recent discovery of Coconut as a health food.The recipes are very clear with intricate details .For my first Ice Dream I picked Bananas,yes! I love them for breakfast ,in smoothie or snacking ,these universal unseasonal fruits are packed with nutrients.Roasting the Bananas brings out the delicious caramelized flavor of the fruit and blended in coconut milk ,cinnamon and nuts,this is by far the tastiest concoction with bananas I ever had.The berry sauce with fresh berries of the season makes the ice dream all the more succulent.

Recipe by Rachel Albert-Matesz as in Ice Dream Cookbook.
Ingredients
3 medium-size ripe bananas, peels removed (about 2 1/2 cups when sliced)
2 to 3 tablespoons real maple syrup
1 tablespoon virgin-pressed coconut oil or palm shortening
1/3 cup cool or cold filtered water
2 teaspoon unflavored gelatin or 3/4 teaspoon agar agar powder (not the flakes)
1 tablespoon honey or agave syrup or 1 1/2 tablespoons maple syrup; additional 1 tablespoon as needed
1/4 to 1/2 teaspoon pure stevia extract powder or 1/2 to 1 teaspoon clear stevia extract liquid (start with less; add more only if needed).
1/8 teaspoon finely ground, unrefined sea salt
1 teaspoon pure vanilla extract or alcohol-free vanilla flavoring
1/2 teaspoon ground cinnamon or 1/4 teaspoon ground nutmeg, optional
1 3/4 cups (one 14 ounce can) unsweetened preservative free coconut milk (regular, not lite).
Method
1-Gently melt coconut or palm oil in a small saucepan over low heat. Set aside. Preheat the oven to 450 degrees. Lightly oil a 2 quart (preferably glass or Pyrex) baking dish. I use an 8 x 10 or a 9×9x2 inch pan or a 9 inch Pyrex pie plate. don’t use a large pan or the syrup will burn.
2-Slice the bananas into 2 inch pieces into a medium bowl. Toss with maple syrup and coconut or palm oil. Scrape into the prepared pan. Reduce the heat to 400 degrees F and bake for 30 to 35 minutes (stir only one time) until bananas look browned and cooked through.
3-Add 1/3 cup water to a small saucepan. Slowly sprinkle with gelatin or agar agar powder. Let stand for 2-5 minutes to soften. Warm over medium-low heat, without stirring until gelatin or agar agar dissolves.
Scrape the mixture into a blender, vita-mix or food processor. Add the honey, sea salt, and stevia. Blend until smooth.
4-Add the roasted banana mixture, coconut milk, vanilla, and optional cinnamon. Blend until smooth , stopping to scrape the sides with a spatula. For a sweeter taste, add an additional 1/8 teaspoon stevia and/or 1 tablespoon honey. Blend, taste, and repeat if needed.
5-Pour into one or more wide-mouthed jars. Cover and refrigerate for at least 6 hours before churning.
6-Scrape the chilled custard into the canister of your ice cream maker. Churn according to the manufacturer’s instructions.
7-Serve immediately or spoon into several 8-to 16-ounce freezer safe containers. Cover and freeze for 3 or more hours for a firmer texture.
8-Soften solidly frozen dessert by placing it in the refrigerator for 30 to 45 minutes or on the counter for 15 to 30 minutes before serving.
Without the Ice cream machine method
You can make the Ice dream even without the Ice cream machine.After the step 4,transfer the Ice Dream mixture in to a freezer proof container,preferably air tight.Freeze for about an hour,then get the container out and whisk the mixture using a spatula or hand held whisk or electric whisk to break the ice crystals forming over the edges of the container.Freeze and whisk again after 30-40 minutes ,repeat this for about 6 hours until the mixture is almost frozen.Serve immediately or freeze.Do as in step 8 to serve.

Blueberry Sauce
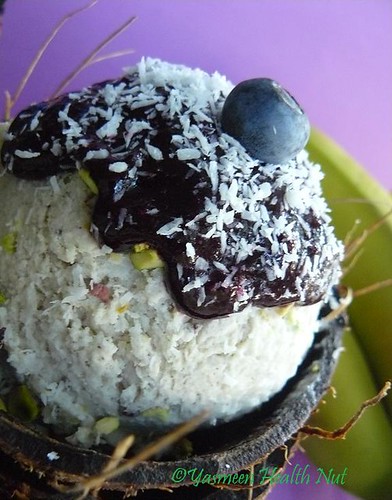
Recipe by Rachel Albert-Matesz as in Ice Dream Cookbook.
Ingredients
4 cups fresh blueberries,rinsed and drained or 5 cups frozen blueberries
1/4 cup honey,agave nectar or 1/3 cup maple syrup(I used just 1 tablespoon)
1 pinch unrefined mineral-rich sea salt
2 tablespoon arrowroot powder(I used 1 tablespoon corn starch)
1/4 or 1/2 teaspoon pure stevia extract powder or 1/2 to 1 teaspoon clear stevia extract liquid(start with less;add more only if needed)
2 tablespoon fresh lemon juice or orange juice
Directions
1.Combine the blueberries and honey in a heavy 2 to 3 quart saucepan.Cook over medium heat until berries bubble and release their juices,about 5 minutes
2.Dissolve arrowroot and stevia in lemon or orange jucie and add to the fruit.Reduce heat to medium-low and cook for 2 to 4 more minutes until the mixture begins to thicken.Remove from heat and allow to cool.
3.For a smoother sauce,mash or puree half the berries with a potato masher or in a blender.
4.Transfer the mixture to wide-mouth jars or glass bowls.Cover when cool,and refrigerate.When cold to the touch ,freeze when you don't plan to use within 3 to 4 weeks,leaving at least 1 inch space at the top of the jar.
5.Serve close to room temperature ,or warm briefly in a small saucepan over low heat.
Peach Melba

The classic Ice cream dessert was originally created by French chef Escoffier ,in the honor of the Australian singer,Nellie Melba,at the Hotel Savoy in London in 1892.
Made with two favorite summer fruits :peaches and raspberry served with Vanilla ice cream,the fruity dessert sounded very easy to put together with the batch of Roasted Banana nut Ice Dream.
Ingredients
2 cups cool or cold filtered water
1/4 teaspoon pure stevia extract or 1/4 to 1/2 teaspoon clear stevia liquid
2 tablespoon honey or agave nectar
1 teaspoon pure vanilla extract or natural vanilla flavoring
4 large ripe peaches
8 scoops of Roasted Banana nut Ice dream or use any of the Ice dreams flavors in the book
1 cup Raspberry sauce *
1/4 to 1/2 cup toasted almonds or pistachios for garnish.
Directions
1.Combine the water,stevia,optional honey,vanilla,and peaches in 2 to 3 quart pot.Bring to boil over medium-high heat.Reduce heat to medium-low and simmer,uncovered,for 15 minutes ,until fork tender.Turn the peaches 3 times,about once every 3 to 4 minutes.(Set them in the pot with their stem ends up,then turn them upside down.This way,you always know which direction they should be facing as opposed to just setting them on their sides).Exact time will depend upon the size and ripeness of the peaches.
2.Remove peaches and reduce the poaching liquid by slow boiling for about 15 minutes,uncovered ,until you have about 1/2 cup.Transfer the peaches to a pyrex bowl and juices to another bowl or small jar.cover and refrigerate until cold.You can do this up to 2 days ahead.
3.To serve,peel,halve and pit the peaches.Divide reserved poaching liquid among 4 dessert dishes or wine glasses.Add a scoop of Ice Dream,and place a peach half on either side of the Ice Dream.Spoon the raspberry sauce in a wide band overlapping both the peach halves and the Ice Dream.Garnish with nuts and serve immediately.
4.Refrigerate unused peaches and sauce and use withing a few days.
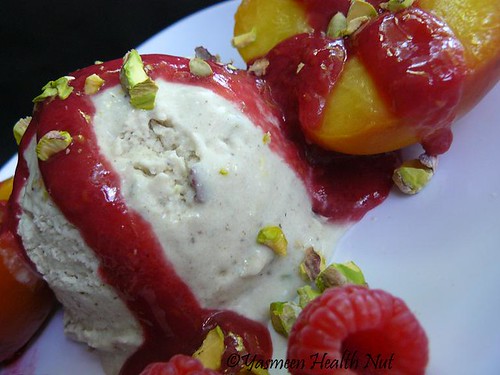
*Raspberry sauce recipes remains the same as the bluberry sauce,strain the seeds if desired after pureeing the sauce.
Variations
** Replace water with white grape juice;then omit stevia and honey
** Replace peaches with nectarines,or raspberry sauce with strawberry ,blueberry or cherry sauce.
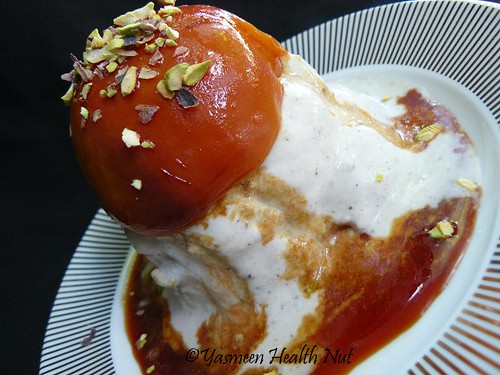
I served this melting scoop over the reduced poaching liquid ,peach halve and roasted pistachois.
More about Rachel's Secret Ingredients
Stevia,the Healthy Sweetener
Stevia is a non-caloric herbal sweetener extracted from the leaf of South American plant-Stevia Rebaudiana-a small perennial shrub that produces incredibly small,sweet leaves that taste 50 times sweeter than table sugar.Unlike Caloric Sweeteners,Stevia is non-cariogenic,which means it doesn't promote tooth decay,and it has no effect on blood glucose levels,which makes it safe for diabetics,people who suffer from reactive hypoglycemia,and anyone who wants to avoid adverse effects of sugar and artificial sweeteners.
Europeans have known about it since the 16th century when the Spanish conquistadors discovered the natives of South American using the leaves of the Stevia plant to Sweeten Yebra mate`,their traditional herbal beverage.Researches were amazed to discover that it took only one leaf to sweeten an entire jar of their bitter tea.The leaves have also been used therapeutically by indigenous people as antiseptic and aid to healing wounds.
Stevia has been used widely as a sweetener in Paraguay,Korea,Thailand,China,Japan and several other countries,with no reported adverse effects.Stevia was first introduced to the United states in 1918,yet very few Americans have heard of it.Why?Stevia is an unpatentable product of nature;it threatens the multi-billion dollar a year artificial sweetener industry,which has been lobbied heavily to keep the sweet leaf off the market.
How to use Stevia?
It takes time to get used to the taste of stevia.The key to avoid the bitter after taste of Stevia is to use it precisely,usually tiny pinches or the purified powder or several drops of the clear liquid ,at a time.Remember more is not always better with stevia,only a minuscule amount is needed to produce a sweet taste.The cookbook provides the clear measurement guidelines to using stevia to substitute for sugar.
Stevia is available in many natural foods stores in US.Stevia comes in several forms and concentrations.
Green Stevia leaves and powder :made from the leaves,this represents the least concentrated form of the herb.
White Stevia Extract Powder :extracted from the leaves of the plant and has a smoother flavor than the unrefined green powder.
Green Stevia Liquid :liquid is made from whole stevia leaves
Clear Stevia Extract liquid :made from the concentrated steviosides,one of the main constituents of Stevia.
The Goodness of Coconut

Coconut is the tropical wonder food packed with essential nutrients.The coconut water is best thirst quencher while the copra(the meat of the nut) is used to make coconut oil,coconut butter and most delicious of all,the coconut milk.

The coconut oil has long been misunderstood as unhealthy saturated fat,but recent studies have revealed ,the medium chain fatty acid in coconut oil is does not have a negative effect on cholesterol and help to protect against heart disease.Also helps to lower the risk of both atherosclerosis and heart disease.
The coconut milk is said be anti-carcinogenic, anti-microbial, anti-bacterial, and anti-viral. The main saturated fat that it contains, lauric acid, is also found in mother's milk and has been shown to promote brain development and bone health. Some hope that coconut milk, with its powerful anti-viral properties, can one day be used in the fight against AIDS.
Rachel's exclusively uses the healthy coconut oil and coconut milk to substitute for the dairy fat(butter) and milk in the Ice Dream recipes.
If Allergic to Coconut Milk?
Replace the coconut milk with combination of cow's milk and heavy cream,using equal parts of milk and cream or 2 parts cream to 1 part milk.Use Organic or grass-fed cow's milk.
Get your Copy.
The cookbook is a best buy for any diet-conscious ,Ice-cream aficionados and those on restricted diets(low-sugar,gluten-free,dairy-free). Purchase The Ice Dream CookBook at Rachel's blog or at Amazon.com

Rachel Albert-Matesz grew up eating a typical American Diet of refined and overly processed foods,fries and ketchup were her serving of vegetables.The nickname Betty baker (as in Betty Crocker) best suited her for her obsession with sweet baked goodies.The nutrition deficient diet eventually took the toll on her health with conditions like hypoglycemic episodes,cavities,acne,brittle nails,painful constipation,depression,mood swings,painful menstrual periods and a weight problem.In her quest for good health she discovered natural alternatives for a healthier diet,with keen desire to help other she became the "healthy cooking coach".Learn more about her story at TheHealthyCookingCoach.com.
She took the Challenge of creating a nutritious ice-cream with better all-natural ingredients.Her book Ice Dream Cookbook is the sweet success of endless testing and tasting.The cookbook has 80 delicious and healthy recipes with more than 200 Variations.The book discusses the essentials of incorporating healthy ingredients and provides alternatives to the common food allergens such as dairy,nuts,soy and wheat(gluten).The Coconut milk and virgin pressed Coconut oil is highlighted as the healthier substitutes for the fatty dairy cream and butter.She uses non-caloric herbal sweetener stevia along with other natural sweeteners like Agave nectar ,honey and maple syrup.In this way She cut the amount of sugar but maintained a similarly satisfying level of sweetness and lessen the health hazards of sugar at the same time. The book also has useful guidelines for equipments and techniques needed for whipping up the best tasting Ice Dream.
Rachel has created a whole range of flavors ,from basic like Vanilla ,Chocolate chip,Maple Pecan and Orange cream Ice Dream to beyond basic flavors like Avocado,Basil,Ginger,Lemon cookie crumble and Peppermint.Coffee and tea also have a place in these delectable dessert.My favorite pick had to the fruit and nut flavored.
There is also a chapter each on variety of sauces(fruity,chocolate and more) ,compotes and gluten-free cookies to go with the Ice dreams.
Roasted Banana Nut Ice Dream with Blueberry Sauce
I was truly elated when Rachel sent me a copy for review.With summer at its peak,this book couldn't have come at a better time.This book also reaffirms my recent discovery of Coconut as a health food.The recipes are very clear with intricate details .For my first Ice Dream I picked Bananas,yes! I love them for breakfast ,in smoothie or snacking ,these universal unseasonal fruits are packed with nutrients.Roasting the Bananas brings out the delicious caramelized flavor of the fruit and blended in coconut milk ,cinnamon and nuts,this is by far the tastiest concoction with bananas I ever had.The berry sauce with fresh berries of the season makes the ice dream all the more succulent.

Recipe by Rachel Albert-Matesz as in Ice Dream Cookbook.
Ingredients
3 medium-size ripe bananas, peels removed (about 2 1/2 cups when sliced)
2 to 3 tablespoons real maple syrup
1 tablespoon virgin-pressed coconut oil or palm shortening
1/3 cup cool or cold filtered water
2 teaspoon unflavored gelatin or 3/4 teaspoon agar agar powder (not the flakes)
1 tablespoon honey or agave syrup or 1 1/2 tablespoons maple syrup; additional 1 tablespoon as needed
1/4 to 1/2 teaspoon pure stevia extract powder or 1/2 to 1 teaspoon clear stevia extract liquid (start with less; add more only if needed).
1/8 teaspoon finely ground, unrefined sea salt
1 teaspoon pure vanilla extract or alcohol-free vanilla flavoring
1/2 teaspoon ground cinnamon or 1/4 teaspoon ground nutmeg, optional
1 3/4 cups (one 14 ounce can) unsweetened preservative free coconut milk (regular, not lite).
Method
1-Gently melt coconut or palm oil in a small saucepan over low heat. Set aside. Preheat the oven to 450 degrees. Lightly oil a 2 quart (preferably glass or Pyrex) baking dish. I use an 8 x 10 or a 9×9x2 inch pan or a 9 inch Pyrex pie plate. don’t use a large pan or the syrup will burn.
2-Slice the bananas into 2 inch pieces into a medium bowl. Toss with maple syrup and coconut or palm oil. Scrape into the prepared pan. Reduce the heat to 400 degrees F and bake for 30 to 35 minutes (stir only one time) until bananas look browned and cooked through.
3-Add 1/3 cup water to a small saucepan. Slowly sprinkle with gelatin or agar agar powder. Let stand for 2-5 minutes to soften. Warm over medium-low heat, without stirring until gelatin or agar agar dissolves.
Scrape the mixture into a blender, vita-mix or food processor. Add the honey, sea salt, and stevia. Blend until smooth.
4-Add the roasted banana mixture, coconut milk, vanilla, and optional cinnamon. Blend until smooth , stopping to scrape the sides with a spatula. For a sweeter taste, add an additional 1/8 teaspoon stevia and/or 1 tablespoon honey. Blend, taste, and repeat if needed.
5-Pour into one or more wide-mouthed jars. Cover and refrigerate for at least 6 hours before churning.
6-Scrape the chilled custard into the canister of your ice cream maker. Churn according to the manufacturer’s instructions.
7-Serve immediately or spoon into several 8-to 16-ounce freezer safe containers. Cover and freeze for 3 or more hours for a firmer texture.
8-Soften solidly frozen dessert by placing it in the refrigerator for 30 to 45 minutes or on the counter for 15 to 30 minutes before serving.
Without the Ice cream machine method
You can make the Ice dream even without the Ice cream machine.After the step 4,transfer the Ice Dream mixture in to a freezer proof container,preferably air tight.Freeze for about an hour,then get the container out and whisk the mixture using a spatula or hand held whisk or electric whisk to break the ice crystals forming over the edges of the container.Freeze and whisk again after 30-40 minutes ,repeat this for about 6 hours until the mixture is almost frozen.Serve immediately or freeze.Do as in step 8 to serve.

Blueberry Sauce
Recipe by Rachel Albert-Matesz as in Ice Dream Cookbook.
Ingredients
4 cups fresh blueberries,rinsed and drained or 5 cups frozen blueberries
1/4 cup honey,agave nectar or 1/3 cup maple syrup(I used just 1 tablespoon)
1 pinch unrefined mineral-rich sea salt
2 tablespoon arrowroot powder(I used 1 tablespoon corn starch)
1/4 or 1/2 teaspoon pure stevia extract powder or 1/2 to 1 teaspoon clear stevia extract liquid(start with less;add more only if needed)
2 tablespoon fresh lemon juice or orange juice
Directions
1.Combine the blueberries and honey in a heavy 2 to 3 quart saucepan.Cook over medium heat until berries bubble and release their juices,about 5 minutes
2.Dissolve arrowroot and stevia in lemon or orange jucie and add to the fruit.Reduce heat to medium-low and cook for 2 to 4 more minutes until the mixture begins to thicken.Remove from heat and allow to cool.
3.For a smoother sauce,mash or puree half the berries with a potato masher or in a blender.
4.Transfer the mixture to wide-mouth jars or glass bowls.Cover when cool,and refrigerate.When cold to the touch ,freeze when you don't plan to use within 3 to 4 weeks,leaving at least 1 inch space at the top of the jar.
5.Serve close to room temperature ,or warm briefly in a small saucepan over low heat.
Peach Melba

The classic Ice cream dessert was originally created by French chef Escoffier ,in the honor of the Australian singer,Nellie Melba,at the Hotel Savoy in London in 1892.
Made with two favorite summer fruits :peaches and raspberry served with Vanilla ice cream,the fruity dessert sounded very easy to put together with the batch of Roasted Banana nut Ice Dream.
Ingredients
2 cups cool or cold filtered water
1/4 teaspoon pure stevia extract or 1/4 to 1/2 teaspoon clear stevia liquid
2 tablespoon honey or agave nectar
1 teaspoon pure vanilla extract or natural vanilla flavoring
4 large ripe peaches
8 scoops of Roasted Banana nut Ice dream or use any of the Ice dreams flavors in the book
1 cup Raspberry sauce *
1/4 to 1/2 cup toasted almonds or pistachios for garnish.
Directions
1.Combine the water,stevia,optional honey,vanilla,and peaches in 2 to 3 quart pot.Bring to boil over medium-high heat.Reduce heat to medium-low and simmer,uncovered,for 15 minutes ,until fork tender.Turn the peaches 3 times,about once every 3 to 4 minutes.(Set them in the pot with their stem ends up,then turn them upside down.This way,you always know which direction they should be facing as opposed to just setting them on their sides).Exact time will depend upon the size and ripeness of the peaches.
2.Remove peaches and reduce the poaching liquid by slow boiling for about 15 minutes,uncovered ,until you have about 1/2 cup.Transfer the peaches to a pyrex bowl and juices to another bowl or small jar.cover and refrigerate until cold.You can do this up to 2 days ahead.
3.To serve,peel,halve and pit the peaches.Divide reserved poaching liquid among 4 dessert dishes or wine glasses.Add a scoop of Ice Dream,and place a peach half on either side of the Ice Dream.Spoon the raspberry sauce in a wide band overlapping both the peach halves and the Ice Dream.Garnish with nuts and serve immediately.
4.Refrigerate unused peaches and sauce and use withing a few days.
*Raspberry sauce recipes remains the same as the bluberry sauce,strain the seeds if desired after pureeing the sauce.
Variations
** Replace water with white grape juice;then omit stevia and honey
** Replace peaches with nectarines,or raspberry sauce with strawberry ,blueberry or cherry sauce.
I served this melting scoop over the reduced poaching liquid ,peach halve and roasted pistachois.
More about Rachel's Secret Ingredients
Stevia,the Healthy Sweetener
Stevia is a non-caloric herbal sweetener extracted from the leaf of South American plant-Stevia Rebaudiana-a small perennial shrub that produces incredibly small,sweet leaves that taste 50 times sweeter than table sugar.Unlike Caloric Sweeteners,Stevia is non-cariogenic,which means it doesn't promote tooth decay,and it has no effect on blood glucose levels,which makes it safe for diabetics,people who suffer from reactive hypoglycemia,and anyone who wants to avoid adverse effects of sugar and artificial sweeteners.
Europeans have known about it since the 16th century when the Spanish conquistadors discovered the natives of South American using the leaves of the Stevia plant to Sweeten Yebra mate`,their traditional herbal beverage.Researches were amazed to discover that it took only one leaf to sweeten an entire jar of their bitter tea.The leaves have also been used therapeutically by indigenous people as antiseptic and aid to healing wounds.
Stevia has been used widely as a sweetener in Paraguay,Korea,Thailand,China,Japan and several other countries,with no reported adverse effects.Stevia was first introduced to the United states in 1918,yet very few Americans have heard of it.Why?Stevia is an unpatentable product of nature;it threatens the multi-billion dollar a year artificial sweetener industry,which has been lobbied heavily to keep the sweet leaf off the market.
How to use Stevia?
It takes time to get used to the taste of stevia.The key to avoid the bitter after taste of Stevia is to use it precisely,usually tiny pinches or the purified powder or several drops of the clear liquid ,at a time.Remember more is not always better with stevia,only a minuscule amount is needed to produce a sweet taste.The cookbook provides the clear measurement guidelines to using stevia to substitute for sugar.
Stevia is available in many natural foods stores in US.Stevia comes in several forms and concentrations.
Green Stevia leaves and powder :made from the leaves,this represents the least concentrated form of the herb.
White Stevia Extract Powder :extracted from the leaves of the plant and has a smoother flavor than the unrefined green powder.
Green Stevia Liquid :liquid is made from whole stevia leaves
Clear Stevia Extract liquid :made from the concentrated steviosides,one of the main constituents of Stevia.
The Goodness of Coconut

Coconut is the tropical wonder food packed with essential nutrients.The coconut water is best thirst quencher while the copra(the meat of the nut) is used to make coconut oil,coconut butter and most delicious of all,the coconut milk.

The coconut oil has long been misunderstood as unhealthy saturated fat,but recent studies have revealed ,the medium chain fatty acid in coconut oil is does not have a negative effect on cholesterol and help to protect against heart disease.Also helps to lower the risk of both atherosclerosis and heart disease.
The coconut milk is said be anti-carcinogenic, anti-microbial, anti-bacterial, and anti-viral. The main saturated fat that it contains, lauric acid, is also found in mother's milk and has been shown to promote brain development and bone health. Some hope that coconut milk, with its powerful anti-viral properties, can one day be used in the fight against AIDS.
Rachel's exclusively uses the healthy coconut oil and coconut milk to substitute for the dairy fat(butter) and milk in the Ice Dream recipes.
If Allergic to Coconut Milk?
Replace the coconut milk with combination of cow's milk and heavy cream,using equal parts of milk and cream or 2 parts cream to 1 part milk.Use Organic or grass-fed cow's milk.
Get your Copy.
The cookbook is a best buy for any diet-conscious ,Ice-cream aficionados and those on restricted diets(low-sugar,gluten-free,dairy-free). Purchase The Ice Dream CookBook at Rachel's blog or at Amazon.com