Showing posts with label Cocoa. Show all posts

Saturday, December 25, 2010

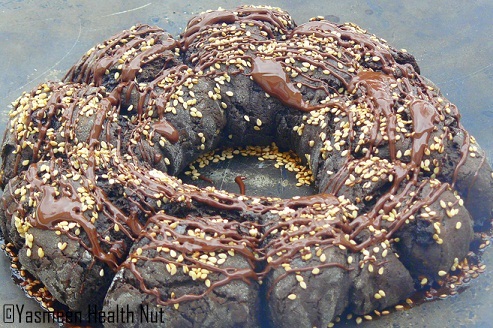
Chocolate Sesame Whole Wheat Wreath Bread


I simply love giving the Daring baker challenges a purely chocolate make over.


The 2010 December Daring Bakers’ challenge was hosted by Penny of Sweet Sadie’s Baking. She chose to challenge Daring Bakers’ to make Stollen. She adapted a friend’s family recipe and combined it with information from friends, techniques from Peter Reinhart’s book.........and Martha Stewart’s demonstration.


The concluding challenge of the year couldn't have been more delicious.Stollen is a rich Holiday bread,or should I say cake,with all its deliciously packed sweet, nutty, fruity and zesty flavors.I choose to call mine bread since I lessened the sweetness and the texture is dense with use of whole wheat flour.More than the richly dark chocolate what stands out the most of the flavors,is the orange zest,so please do not skip this important ingredient for the added zing to this sensational bread.


Recipe :Chocolate Sesame Whole Wheat Wreath Bread
Makes one medium wreath Serves 5-6 people

Ingredients
For Bread Dough
1/4 cup lukewarm water (110º F / 43º C)
1 packages (2 1/4 teaspoons) active dry yeast
1 cup Skimmed Organic milk
4 tablespoons unsalted Organic butter or virgin pressed coconut oil or Pure Ghee
2 1/2 cup whole wheat pastry flour
1/2 cup unsweetened cocoa powder
1/4 cup Pure cane sugar
1/2 teaspoon salt
1/2 teaspoon cinnamon
2 large Organic eggs, lightly beaten
Grated zest of 1 lemon and 1 orange
1 teaspoon pure vanilla extract
1/2 teaspoon (5 ml) lemon extract or orange extract
2/3 cup raisins or dried cranberries or dried mixed fruit
3 tablespoons Orange juice
6 red glacé cherries or fresh cranberries(roughly chopped) for the color and the taste. (optional)
1/2 cup flaked almonds
For topping
2 tablespoon Pure Organic honey
2 tablespoon brown sesame seeds
1/4 cup semi sweet chocolate chips(good quality - 60% cocoa)


Directions:
Soak the raisins
In a small bowl, soak the raisins in cold water (or in the orange juice from the zested orange) and set aside.

To make the dough

Pour warm water into a small bowl, sprinkle with yeast and let stand 5 minutes. Stir to dissolve yeast completely.

In a small saucepan, combine milk and butter over medium - low heat until butter is melted. Let stand until lukewarm, about 5 minutes.

Lightly beat eggs in a small bowl and add lemon and vanilla extracts.

In a large mixing bowl (or in the bowl of an electric mixer with paddle attachment), stir together the flour, cocoa powder,sugar, salt, cinnamon, orange and lemon zests.

Then stir in (or mix on low speed with the paddle attachment) the yeast/water mixture, eggs and the lukewarm milk/butter mixture. This should take about 2 minutes. It should be a soft, but not sticky ball. When the dough comes together, cover the bowl with either plastic or a tea cloth and let rest for 10 minutes.

Add in the mixed peel, soaked fruit and almonds and mix with your hands or on low speed to incorporate. Here is where you can add the cherries if you would like. Be delicate with the cherries or all your dough will turn red!

Sprinkle flour on the counter, transfer the dough to the counter, and begin kneading (or mixing with the dough hook) to distribute the fruit evenly, adding additional flour if needed. The dough should be soft and satiny, tacky but not sticky. Knead for approximately 8 minutes (6 minutes by machine). The full six minutes of kneading is needed to distribute the dried fruit and other ingredients and to make the dough have a reasonable bread-dough consistency. You can tell when the dough is kneaded enough – a few raisins will start to fall off the dough onto the counter because at the beginning of the kneading process the dough is very sticky and the raisins will be held into the dough but when the dough is done it is tacky which isn't enough to bind the outside raisins onto the dough ball.

Lightly oil a large bowl and transfer the dough to the bowl, rolling around to coat it with the oil. Cover the bowl with plastic wrap.
Put it in the fridge overnight. The dough becomes very firm in the fridge (since the butter goes firm) but it does rise slowly… the raw dough can be kept in the refrigerator up to a week and then baked on the day you want.

Shaping the Dough and Baking the Wreath

1. Let the dough rest for 2 hours after taking out of the fridge in order to warm slightly.
2. Line a sheet pan with parchment paper.
3. Preheat oven to moderate 350°F/180°C/gas mark 4 with the oven rack on the middle shelf.
4. Punch dough down, roll into a rectangle about 8 x 12 inches and ¼ inch (6 mm) thick.


Starting with a long side, roll up tightly, forming a long, thin cylinder.
Transfer the cylinder roll to the sheet pan. Join the ends together, trying to overlap the layers to make the seam stronger and pinch with your fingers to make it stick, forming a large circle.
Using Sharp knife, make cuts along outside of circle, in 2-inch (5 cm) intervals, cutting 2/3 of the way through the dough.
Twist each segment outward, forming a wreath shape.Proof for approximately 2 hours at room temperature, or until about 1½ times its original size.
Drizzle with honey all over and sprinkle the sesame seeds,evenly covering the top of the wreath.

Bake
Bake the wreath for 20 minutes, then rotate the pan 180 degrees for even baking and continue to bake for 20 to 30 minutes. The bread will bake to a dark mahogany color, should register 190°F/88°C in the center of the loaf, and should sound hollow when thumped on the bottom.

Chocolate Finishing
Melt the Chocolate chips over double broiler or in the microwave until completely melted and glossy.Drizzle all over the baked wreath.Cut and serve warm. When completely cool, store in a air tight container.The flavor intensifies the next day,makes a delicious treat with morning cuppa.


Peek in other Daring Bakers' take on the exquisite challenge.

Enjoy the rest of the Holidays.Will be back next year with an exciting giveaway.

Tuesday, October 19, 2010

Low Fat Almond Chocolate Mini Pumpkin Pie


Don't you love the vibrant show that nature puts on at this time of the year and exuberance of pumpkins adds to the splendor.Yes,I got my first pumpkin home and made the pie,this one was not so tough to cut through,made my work little easy.I have been posting about pumpkin desserts past two seasons,I present this season another special kind of pie, with almonds ,100% cocoa and dark chocolate chips as the secret ingredients.If you are a regular viewer of the blog,these ingredients are no secret,as I use them often in my recipes.

I do not have a preference for these mini pies over the large pie,making one large pie would be equally good,I just had the pie tins unused for long hence went for the mini version of the pie.The chocolate chips surprise in the filling are simply fantastic. I say this often,will say it again,use 100% cocoa powder and 60% cocoa chocolate chips to get the best benefits of the chocolate.

Recipe :Almond Chocolate Mini Pumpkin Pies
Makes 6 Mini pies or one 9 inch pie
Ingredients
For Crust
1 1/2 cups graham cracker crumbs
3 tablespoons fat free plain yogurt
1/4 cup brown sugar

For Filling
2 cups Pumpkin puree
1/2 cup fine ground raw almonds(or use almond meal)
1/4 cup unsweetened 100% cocoa powder(I use Hersheys)
1/2 cup brown or white sugar or 1/4 cup Agave nectar
*2 Organic eggs
1/4 cup dark chocolate chips(good quality with at least 60% Cocoa,I use Ghirardelli)
2 tablespoon Organic Whole milk
1 teaspoon pure vanilla

*for eggless filling use - 2 table spoon of cornstarch mixed with 1/4 cup whole milk

Method
Bake the crust
Preheat oven to 350F.Mix together graham cracker crumbs, yogurt, and brown sugar in bowl. Press mixture firmly into a min pie tins or a 9 inch pie pan.Bake in preheated oven for 5 minutes.

Whisk the eggs or the egg substitute,stir in the sugar,cocoa powder,vanilla, pumpkin puree and ground almonds,combine well.Fill the mini pie tins or the pie pan with the pumpkin mixture.Drop the chocolate chips evenly in all the pie crust or in the pie pan.Bake in 350F oven for about 25-30 minutes until the center is a little firm to touch.Serve warm or can be refrigerated for up to 2 weeks.

This is my entry for Weekend Herb Blogging #255,hosted this week by Prof Kitty from The Cabinet of Prof. Kitty

Thursday, September 9, 2010

Eggless Mango Chocolate Cake,Eid Delicacy 2


I don't dislike eggs ,but its good to experiment without them every once in a while to create a lighter calorie baked goodies.Also,for those with egg allergies(like my mom ) and on restricted diets this(and the previous) eggless bake wouldn't be a let down.


Talk about the star ingredient in the cake - the mangoes.The mango puree not just replaces the eggs but also adds to the sweetness of the cake.The fresh mango slices in every bite would make the cake a true mango indulgence.And of course the chocolaty touch with 100% cocoa powder cannot be substituted with any other ingredient.


Recipe Eggless Mango Chocolate Cake
Serves 6
Ingredients
1 cup whole wheat pastry flour
1 cup all purpose flour
1/4 cup 100% cocoa powder
1 teaspoon baking powder(alum free)
1/3 cup agave nectar or 1/2 cup brown sugar
1 cup mango puree unsweetened
1/8 teaspoon salt
1 teaspoon pure vanilla extract
1/2 cup reduced fat milk
1/4 cup canola oil
1/4 cup semi-sweet chocolate chips
2 ripe mangoes,sliced lengthwise


Method
Preheat oven to 350ºF and adjust oven rack to middle .Lightly grease and line a 8x8 inch round pan with parchment paper.Arrange in the pan,the fresh mango sliced in a flower pattern.
Sift all the dry ingredients in large mixing bowl,also mix in the chocolate chips.In another mixing bowl whisk together oil,milk,mango puree,vanilla and sugar.

Now combine wet and dry mixtures. Pour in the prepared cake pan and set in the oven for 30-35 minutes until toothpick inserted comes out clean.
Cool cake for 30 minutes and flip on to a plate.Peel off the parchment,slice and serve.Can be refrigerated for a week.


Hard to believe the cherished month of Ramadan is ending soon.Eid marks the celebration of recharged faith.Sweet delicacies of all kinds adorn the eid feasts,the cake would be such a pleasant addition.


Farewell to Ramadan and mangoes......

Eid Mubarak !

Tuesday, July 27, 2010

Daring Bakers : Swiss Swirl Plum Ice Cream Cake


The July 2010 Daring Bakers’ challenge was hosted by Sunita of Sunita’s world – life and food. Sunita challenged everyone to make an ice-cream filled Swiss roll that’s then used to make a bombe with hot fudge. Her recipe is based on an ice cream cake recipe from Taste of Home.

I wasn't expecting to complete this month's magnificent challenge, with all the summers busy schedules and the prep for vacation.As matter of fact I could not entirely finish the challenge,I started putting together the daring bake at the nth hour.This was a do or die ,any mistakes ,I had absolutely no time to redo the challenge.Everything went well as one see the pretty result,but due to lack of time I could not put together the second batch of ice cream to make the layers of different flavors(i.e the bombe effect),the only ice cream filling was the home made vegan plum ice cream.Nonetheless the ice cream was still every bit delicious,with the spongy chocolate Swiss rolls and fruity ice cream

Thanks to Sunita's extensive pictorial recipe , the challenge was clearly understood.The neatly wrapped Swiss rolls are a really beauty,to get the spongy texture you have beat the eggs to the right consistency of airiness.You can play around with the flavors of the rolls , plain vanilla , chocolate,dried ground berries or matcha.


This has to be the summer I indulged in most home made ice creams.The vegan plum ice cream might just be the last of the season,the fresh plums not just impart prettiest pink color but also a nice sweet tart flavor to the ice cream.If you are watching for those fat calories use different layers of fruit sorbet instead and replace the cream filling in the rolls with fruit preserves.

Recipe :Chocolate Swiss rolls with fresh Plum Cream filling
Ingredients
3 large Organic eggs
1/2 cup white sugar + 1 teaspoon for rolling
3 tablespoon all purpose flour,sifted
3 tablespoon natural unsweetened cocoa powder, sifted
1 tablespoon boiling water
a little oil for brushing the pans

For the filling
3/4 cup low fat whipping cream
3/4 cup fresh red plums,chopped

Method
Bake the cake
1. Pre heat the oven at 200 deg C /400 deg F approximately. Brush the baking pans ( 11 inches by 9 inches ) with a little oil and line with parchment paper. If you have just one pan, bake one cake and then let the pan cool completely before using it for the next cake.
2. In a large mixing bowl, add the eggs and sugar and beat till very thick; when the beaters are lifted, it should leave a trail on the surface for at least 10 seconds.
3.Add the flour mixture, in three batches and fold in gently with a spatula. Fold in the water.
4.Divide the mixture among the two baking pans and spread it out evenly, into the corners of the pans.
5. Place a pan in the center of the pre heated oven and bake for about 10-12 minutes or till the center is springy to the touch.
Roll ,unroll and roll the cake
6. Spread a kitchen towel on the counter and sprinkle a little caster sugar over it.
7. Turn the cake on to the towel and peel away the baking paper. Trim any crisp edges.Starting from one of the shorter sides, start to make a roll with the towel going inside. Cool the wrapped roll on a rack, seam side down.Repeat the same for the next cake as well.
Prepare the cream filling
8.In a large bowl, add the cream beat till very thick,mix in the plums.
9. Divide the cream mixture between the completely cooled cakes.Open the rolls and spread the cream mixture, making sure it does not go right to the edges (a border of ½ an inch should be fine).
10.Roll the cakes up again, this time without the towel. Wrap in plastic wrap and chill in the fridge till needed, seam side down.

Recipe :Vegan Plum ice cream
The ice cream is made without an ice cream maker.

Ingredients
3 ripe red plums,seeded and diced
2 and 1/2 cup Thick Coconut milk
1 tablespoon virgin pressed coconut oil
1 teaspoon vanilla extract
1/2 cup agave nectar or maple syrup
1 tablespoon white sugar
1 tablespoon powdered agar-agar or gelatin

Method
Dissolve the agar-agar or gelatin in 2 tablespoon of hot water.
In a small sauce pan,add the oil, plums and sugar and let cook until soft and bubbly about 10 minutes,add the dissolved agar-agar mixture 3-4 minutes before turning off the heat.Cool.
Transfer the plum mixture in a blender,add the coconut milk,agave nectar and blend until smooth.
Pour into a freezer friendly container and freeze till firm around the edges. Remove from the freezer, beat till smooth and return to the freezer. Do this 3-4 times and then set completely.


Recipe : Hot Fudge Sauce
Ingredients
1/2 cup Agave nectar
3 tablespoon natural unsweetened cocoa powder
2 tablespoon cornstarch
1 and 1/2 cup water
1 tablespoon organic butter or virgin pressed coconut oil
1 teaspoon vanilla extract

Method
1. In a small saucepan, whisk together the sugar, cocoa powder, cornflour and water.
2. Place the pan over heat, and stir constantly, till it begins to thicken and is smooth (for about 2 minutes).
3. Remove from heat and mix in the butter and vanilla. Keep aside to cool

Assembly
1. Cut the Swiss rolls into 20 equal slices ( approximately 2 cms each ).
2. Cover the bottom and sides of the bowl in which you are going to set the dessert with cling film/plastic wrap.
3. Arrange two slices at the bottom of the pan, with their seam sides facing each other. Arrange the Swiss roll slices up the bowl, with the seam sides facing away from the bottom, to cover the sides of the bowl. Cover the bowl with plastic wrap and freeze till the slices are firm (at least 30 minutes).
4. Soften the Plum ice cream. Take the bowl out of the freezer, remove the cling film cover and add the ice cream on top of the cake slices. Spread it out to cover till the half of the bowl. Cover the bowl with plastic wrap and freeze till firm ,3-4 hours.Add the fudge sauce over the ice cream, cover and freeze till frozen 6-8 hours.
Keep the cake out of the freezer for at least 10 minutes before slicing, depending on how hot your region is. Slice with a sharp knife, dipped in hot water.Serve with some fresh plum slices on side.


Catch more Swirly fun at daring bakers blog roll.

Sunday, June 27, 2010

Chocolate Pavlova with Avocado Chocolate Mousse and Summer fruit


Chocolate Pavlova with Avocado Chocolate Mousse.


The June 2010 Daring Bakers’ challenge was hosted by Dawn of Doable and Delicious. Dawn challenged the Daring Bakers’ to make Chocolate Pavlovas and Chocolate Mascarpone Mousse. The challenge recipe is based on a recipe from the book Chocolate Epiphany by Francois Payard

The fluffy sweet confection,Meringue is one those seemingly easy recipe with simple ingredients - Egg whites and Sugar.But not until the two are married with utmost care ,the result can be disastrous.To understand the chemistry behind the amazing dessert in short,breaking the egg protein until it can expand to about 8 times the original volume while whipping in the sugar to stabilize the multiplied volume.The glossy mixture when baked at moderate temperature results in an airy melt-in-your-mouth dessert.
Meringues gives a deliciously divine touch in some of the popular desserts - pies,cakes,pavlova,baked Alaska and macaroons(the meringue cookies)

Crucial tips to yield perfect meringue :
*Use clean, dry bowl,preferably a glass bowl, ceramic or copper.Even a minuscule amount of fat can ruin the meringue.
*Separate the eggs when cold and then let the whites reach room temperature before beating them.
*Besides the sugar,use either cream of tartar or white vinegar or lemon juice to stabilize the meringue. Add 1/8 teaspoon of one of these per egg white to the unbeaten eggs.
*Only super fine sugar works ,any kind of sugar substitutes fail to hold the meringue.
*The flavoring can affect the acidity of the meringue,be sure to use dry ground flavors- Cocoa,coffee,saffron,macha tea,dried shred coconut are some of the best.
*Bake at low temperature,200-250F is ideal.If the temperature is too high, the the top browns before the water inside has time to evaporate.


A lovable dessert - pavlova,is pure meringue confection.The daring challenge was to make it all chocolaty ,using cocoa for flavoring the meringue and topping with the rich mascarpone mousse.I was looking for a lighter pavlova,lower in calories.I could not possibly fiddle with the meringue ingredients,cause no sugar substitute works,plain white sugar is the only kind of sweetener fit for a perfect meringue.But for the topping could certainly be replaced with a lighter vegan Avocado mousse,chocolaty and guilt-free.


Summer Fruit Pavlova with toasted coconut.
My first trial was plain meringue.Kept the height in this one,the slice of this looked much prettier with myriad of summer fruits.How ever both plain and chocolate were equally sweet and enjoyable.
Believe it or not,I used a hand held whisk,that amplified the effort of making the meringue,takes about 10-12 minutes of effortful non-stop beating, compare that to 5-6 minutes in a machine whisk.My ever so curious toddler was excited at sight of cracking the eggs,thinking mom's making a special omelet,soon started wondering about the endless whipping.The glossy texture seemed like a delectable cream,but the baked result with an even exciting marshmallow-like treat.

Recipe :Low Fat Chocolate Pavlova with Avocado Chocolate Mousse.
Ingredients
3 Egg whites
2/3 cup fine white sugar
1/2 teaspoon cream of tartar(to stabilize the meringue)
1 tablespoon 100% cocoa powder
1 teaspoon instant coffee powder
pinch of salt
1 cup Vegan Avocado Chocolate Mousse(Click the link to see the recipe already posted).
Sliced peaches and fresh mint for garnish.

Method
In an impeccably clean bowl,add the egg whites and using an electric mixer, with the whisk attachment or a hand held whisk, beat the egg whites on medium-high speed until they hold soft peaks.Add the cream of tartar and sugar, a tablespoon at a time, and continue to beat until the meringue is glossy and holds very stiff peaks.


Using a spatula transfer the meringue on a baking sheet lined with parchment paper,you could either spread it with slightly hallow center or keep it high.Alternatively one can use a pastry bag and pipe the meringue into whatever shapes you desire.

Bake for about 2 hours or until the meringue is dry and crisp. Cool and store in an airtight container for up to 3 days.

To serve the chocolate pavlova,spread the avocado chocolate mousse,top with the sliced peaches,mint and slice.

For the plain Pavlova ,do not add the cocoa and the coffee powder.While spreading on the baking sheet,keep the meringue high.Rest of the recipe remains same.When done,garnish with toasted coconut.Sprinkle the cocoa powder on the serving plate,slice the meringue with a sharp knife, and serve with fresh fruits alongside.


Fall in love with more Pavlovas at Daring baker's blog roll.

Tuesday, June 8, 2010

Eat and Beat Diabetes Book Review and Brownies


Ever craved for a brownie that's healthy? well,this is it.

The Eat and Beat Diabetes with Picture Perfect Weight Loss by Dr.Howard M.Shapiro and Chef Franklin Becker is complete with such healthy transformations of foods otherwise considered taboo for diabetics.But wait,you don't have to be diabetic to try these wholesome ,low calorie,low fat and low sugar recipes.Those over weight ,diabetic,pre-diabetic or at risk for diabetes and also those worried about heart disease or looking for options to lower weight, blood pressure or cholesterol or simply a health nut determined to find alternatives to unhealthy eating,would cherish this book.The book is an eye opener of healthy yet most delicious foods imaginable.

The Beat Diabetes Team
In Eat & Beat Diabetes with picture perfect Weight Loss,Dr.Howard Shapiro uses the same visual method of food comparisons that made his best selling weigh loss books so popular and easy to use.Now he has teamed with executive chef,Franklin Becker,a diabetic himself,and together they reveal the secrets to a diet that can actually help you prevent and beat diabetes - without depriving yourself of delicious foods.
Besides Chef Franklin Becker,other premier chefs from major restaurants around the country have contributed their shared of healthfully transformed tasty recipes.Also includes a 7 day sample meal plan.

Beat Diabetes Pyramid
Dr.Shapiro's Beat Diabetes Pyramid depicts a simple understanding of food groups that fight diabetes and lose weight.It not about depriving food but about making the right choices from the bounty of foods that can provide good defense to stay healthy.The pyramid reveals the secret weapons,the specific nutrients that actually targets diabetes,beating back its potential side effects and maintaining the healthy weight that is key to controlling the disease.

A Call to Action for Parents of Kids at risk
Children pay the terrible price of being overweight ,by being at risk for type 2 diabetes ,heart disease ,asthma,digestive disorders,joint problems,vision problems,liver disease besides the psychologically painful toll.
The books offers the solution of changing the unhappy unhealthy state of kids,by asking parents to take the responsibility,teaching them to make the right choices through the beat diabetes pyramid,while keeping in mind the dos and don'ts for building a strong foundation of healthy eating for children.

The Food comparisons
A picture is worth thousand words,that so true with this book.Includes more than 100 capturing photos of picture-perfect food comparisons(calories,fiber,fat and sugar) that help you make the right choices.
Visually compare your favorite foods loaded with calories and fat to much healthier and equally tempting choices.Like the kiddie treat even a mother can love ,a scoop of frozen yogurt with cone 140 calories instead of 4 ounce chocolate chip cookie with 640 calories and 40 grams of fat!.
You actually get a more satisfying healthy food portion if including more fruits and vegetables than the unhealthy meal concentrated with fats or sugar.For example ,the small breakfast of a muffin and chai latte with as high as 840 calories can be substituted with 2 whole grain low sugar waffles,generous serving of berries and coffee with low cal sweetener totaling just 205 calories.
A glimpse of the picture perfect food comparisions :


Sweeteners
Contrary to the assumption of abandoning the sweet foods for diabetics,Dr.Shapiro's beat diabetes pyramid allows indulgence in right kind of sweets- that includes fruits,no sugar added frozen treats and no added sugar candies.The lo-cal sweeteners(including the artificial) pose no fear as long as the sweetener is approved by the U.S. Food and Drug Administration(FDA)

Soy Power
The book highlights the Soy protein and its good role in beating or preventing the disease.The phytonutrients in soy protein are power houses of blood vessel protection,preventing weight gain and regulating insulin levels,hence said to be heart's best friend and a key diabetic fighter.

The Diabetic recipes
The recipes have been prepared keeping in mind the guidelines of the beat diabetes pyramid,by including whole some grains,soy products,good fats, low calorie or sugar free sweeteners and lots of fruits or vegetables.While I cannot reveal all of them but to get the picture here is one of my personal best recipes in the book.

The Beat Diabetes Brownies

I never doubted Heart Healthy dark chocolate's good benefits,Dr.Shapiro resonates the same love for pure dark chocolate and cocoa.My first recipe to test was obvious,the richly chocolate beat diabetes brownies.
I follow the original recipe in most parts except for the sweetener.I don't use any artificial sweetener(Splenda as in this recipe) in my cooking,with liberty to choose a low calorie sweetener,I chose the agave nectar,that has low glycemic Index,and is 25% sweeter than sugar,so you use less,in fact for a cup of sugar you will need only about half cup of agave nectar.Rest of the ingredients remain as in the original recipe.

Be sure to use 100% cocoa powder to get the most of the benefits,Pure canola oil and the soy protein powder used in the recipe is available in health food stores and many super markets in the health foods aisle.


Recipe : Beat Diabetes Brownies
Yields 12 brownies
Ingredients
1/2 cup fine ground whole-wheat flour
1/2 cup unsweetened soy protein powder
5 tablespoon unsweetened 100% cocoa powder
1 cup granulated Splenda(or 1/2 cup agave nectar)
1 1/4 teaspoon baking powder
1/4 teaspoon salt
2/3 cup brewed coffee regular or decaffeinated
1/2 cup sugar-free syrup(preferably chocolate,but any flavor is fine)
1/3 canola oil
1 tablespoon pure vanilla extract
1 cup roasted nuts and seeds of choice(Almonds,walnuts,peacans,sunflower seeds,pumpkin seeds etc)
1 tablespoon raisins(optional)

Method
Preheat oven to 350F.
Oil an 8 or 9 inch square or round baking pan,coat with non stick spray and line the bottom with parchment paper.
In a large bowl combine flour,soy powder,baking powder and salt.Add the sweetener(splenda or agave nectar),coffee,syrup,oil and vanilla,stir until well blended.
Pour mixture in to the prepared pan.Sprinkle the nuts,seeds and raisins evenly over top and press gently in to batter.
Bake 20-25 minutes or until a toothpick inserted near center comes out clean.Cool for 15-10 minutes on a rack.Flip on a cutting board,flip again with nuts side up,peel the parchment and cut in squares.Can be refrigerated for 2 weeks in air tight container.


The ingredients sure speak out loud about health.When it comes to taste and texture, moist with crunchy topping and intensely chocolate and coffee flavor,I could skip my morning coffee for these.Diabetic or not,enjoy them with a glass of light in calories soy milk for a completely healthy snack.

Order your copy of this phenomenal book at Amazon,Barnes & noble,Borders,Books-a-million,Walmart and Target.

Monday, May 31, 2010

Silk's Pure Almond Iced Cocoa Mocha and a Giveaway


Mr.Healthnut helping himself a glass of mighty almond goodness.

A nutritious addition in our diet,velvety smooth ,light and incredibly yum,Silk's new Pure Almond Milk has taken an honorable space in our refrigerator,since introduced to me by the kind folks at Silk.

Topping in the list of Nature's best foods,almonds are attributed as a nut with most fiber,protein and load of essential anti oxidant(Vitamin E).Naturally low in fat and free of cholesterol,the almonds help in lowering bad cholesterol and raising the good cholesterol.Silk Pure Almond™ almond milk is an excellent way to get more of these healthy almonds into your everyday routine.The calorie smart Silk's Pure Almond Milk is just 60 calories for a serving of Original flavor, and 90 for a glass of Vanilla.One can enjoy the almond milk in all the recipes were milk is used.I prefer it chilled from fridge,as is or in bowl of cereal or milk shakes.


Hello Summer! the heat is starting to pick its momentum and the body desires chilled drinks more than ever.The cool refreshing anti-oxidant rich Iced Cocoa Mocha has the light flavor of Silk's vanilla Almond milk intensified with cocoa powder and coffee,a fantastic shake,you'd want to sip every single hot summer's day.

Recipe :Pure Almond Iced Cocoa Mocha
Ingredients
serves 2
2 cups Silk's Pure Almond Milk Vanilla
1/2 cup strong espresso coffee
1 tablespoon 100% cocoa powder
1 tablespoon agave nectar
few ice cubes

Method
Blend all the ingredients(except ice) at high speed for 2 to 3 minutes. Serve immediately in a tall, cold glass with ice cubes.


Silk Pure Almond Giveaway!

For a chance to win Silk's Pure Almond milk ,please leave a comment about ,"Your favorite anti oxidant food(s)?" by end of the week(June 8th).
3 winners will be chosen to receive a free coupon of the product,and one
lucky winner would receive a Silk Pure Almond branded ChicoBag in addition
to the coupon.

Update June 10th : The winners have been choose : SassyAgapi,Becca and Kiran.Congrats!
Please contact me in next 4 days at my email address YasmeenHealthNut@gmail.com
Enjoy!

Monday, May 17, 2010

Raspberry Tofu Dark Chocolate Ice Cream Cake


Tofu does not get any applause in my family.So I have to think of sneaking in this wonder protein in the most unsuspecting places.Like in the ice cream ,the silken tofu married so well with the intense berry flavor,leaving the picky eaters totally clueless about the disliked ingredient in it.


The cake was specially made in jubilation of Nabeel's seventh birth day.Yes,another healthfully blessed year.His asthma has shown significant improvement as he is growing.Watching the diet for low sugar ,low fat foods ,wholesome fruits,vegetables and grains immensely helped in improving his condition.My efforts to get him to eat the best aren't always success,there are some foods he absolutely cannot stand, and tofu is one of those.But I can't give up , had to think harder to incorporate the bland food with lots of flavorful berries to create this delectable cake.


I had to disclose the secret ingredient to him after blissfully finishing the first slice,for it changed his mind about the food,that he had decided to hate till eternity.Now he is more willing to appreciate it,if presented in such decadent dishes.That also means,a thumbs up for my ,eating more tofu mission.The other dishes that got approval were tofu smoothie and parathas,haven't got the chance to post them yet,but will do,one fine day.

Recipe : Raspberry Tofu Ice Cream
8 ounce Soft Silken Tofu
1 cup Coconut milk or almond milk or soy milk
2 cups frozen Raspberries
1/3 cup agave nectar or honey or maple syrup

Method
Process tofu in a blender until smooth. Add the frozen berries,sweetener and process until well smooth.Now add the milk and process again until well blended. Pour into one or more wide-mouthed jars. Cover and refrigerate for at least 6 hours before churning.Scrape the chilled custard into the canister of your ice cream maker. Churn according to the manufacturer’s instructions or if you don't have an ice cream maker,transfer the Ice Cream mixture in to a freezer proof container,preferably air tight.Freeze for about an hour,then get the container out and whisk the mixture using a spatula or hand held whisk or electric whisk to break the ice crystals forming over the edges of the container.Freeze and whisk again after 30-40 minutes ,repeat this for about 6 hours until the mixture is almost frozen.
Serve as is or layer in the chocolate cake as follows.


Recipe :Raspberry Tofu Dark Chocolate Ice Cream Cake
Ingredients
For Dark Chocolate Cake
1 cup all purpose flour
1/2 cup whole wheat flour
1/2 cup unsweetened cocoa powder
2 Organic eggs
2 tablespoon Fat free Sour cream
1/4 cup agave nectar or 1/2 cup dark brown sugar
1/2 cup semi sweet chocolate chips.
1/4 teaspoon salt
1 teaspoon baking powder
2 tablespoon Organic butter or Virgin pressed coconut oil,melted and divided
1/2 cup reduced fat Organic milk

3 cups of Raspberry Tofu Ice cream(as in recipe above)

Method
Melt 1 tablespoon of butter or coconut oil and the semisweet chocolate chips in a bowl(glass or steel) placed over saucepan with gently simmering water(double broiler).Stir occasionally until the mixture is smooth.Set the bowl aside.

Preheat Oven to 375F.Line the bottom of a 8x8 round baking pan with parchment paper.

Sift all the dry ingredients(flours,salt and powders) in large mixing bowl.
In another mixing bowl whisk together melted butter and sugar or agave ,Crack the eggs and whisk until combined.Add the prepared chocolate ganache, stir in milk ,sour cream and combine until mixture comes together. Now add the dry mixture slowly in to the wet mixture while stirring it.

Pour the mixture in to the prepared baking pan.Bake for 25 to 30 minutes until the center of cake come out clean on an inserted toothpick.Cool the cake for at least 30 minutes.Flip in to plate.Remove the parchment at the bottom of the cake.

Assembling the Cake
Thaw the Raspberry Tofu Ice cream for 30 minutes until soft enough to handle.
Line the same baking pan with a plastic wrap,put the cake back in the pan.Scoop the ice cream and spread over the cupcakes just until the pan is full.Cover and freeze for 2-3 hours before unmolding.When set,flip the pan on to a plate,remove the plastic wrap,flip again in to another serving plate to have the Ice cream layer on top.Garnish with some fresh raspberries.To slice,warm a sharp knife under running hot water for an easier cut.
For more fruity finish,prepare some raspberry syrup and pour over each slice.


Health Nut Challenge 6 : I Scream for Ice Cream : Join in the celebration of healthy frozen treats.Send in your best recipe,find details here..

Saturday, March 13, 2010

Purely Chocolate Almond Meringue Cake with Dark chocolate Filling


For a toddler turning three,the pure chocolate cake was perfect to celebrate the special day and also accomplishing to his mom ,who shares the same chocolate passion.


His adventures seem to have gotten even more advanced since he was two.Jumping on the bed,fetching his favorite food from the refrigerator or kitchen counter,sliding down the stairs,wrestling with his big brother,examining all the closets and drawers,gladly after all that exploring, running and jumping around the house,he does settle for quite time reading and imaginative play. Considering his liking for an equally adventurous species in one his favorite books "Five little monkeys Jumping on the bed",I guess he got the most appropriate gift for this special day,the five little monkeys board game,and thankfully the imaginative toy kept him busy for most part of his special day.

What's so special about this chocolate cake? for one,this is mostly chocolate at its best,secondly the joy of almonds and finally its low in sugar ,free of any additives or preservatives.There was one mishap though ,the meringue did not keep tall due to less sugar used.Otherwise the taste was absolutely chocolatey despite changes to lower the calories.My trick here to keep the cake moist sans the extra fat,use some fruit puree instead.

Recipe : Chocolate Almond Meringue Cake with Dark chocolate Filling ,adapted from Tish Boyle and Timothy Moriarty's Chocolate Passion.

Ingredients
For Chocolate Almond Meringue Cake
4 Tablespoons unsweetened nonalkalized Cocoa powder
1/3 cup hot water
1/2 cup all-purpose flour
3/4 cup ground almonds
1 teaspoon baking powder
1/4 teaspoon baking soda
1/4 teaspoon salt
2 tablespoon unsalted butter(softened) or pure ghee
1/2 cup apple puree
1/4 cup reduced fat milk
1/2 cup dark brown sugar or 1/4 cup agave nectar
4 large Organic eggs,separated
1/2 teaspoon pure vanilla extract(alcohol-free)
1/4 teaspoon almond extract
1/4 cup sliced almonds

For rich Chocolate Filling
7 ounces bitter sweet chocolate,finely chopped(or use the chips)
3/4 cup Organic whole milk

Method
Make the Dark Chocolate Filling
Place the chopped chocolate in medium heatproof bowl.Bring the milk to a gentle boil in a small saucepan,pour the hot milk over the chopped chocolate,let stand for 3 minutes to melt the chocolate.Stir gently until the mixture is well blended and smooth.Cover and set it aside to cool for an hour until it has the consistency of frosting.


Make the Chocolate almond meringue cake
1.Position a rack in the bottom third of the oven and preheat to 350F.Lightly butter the bottom of two 9-inch baking pans.Line the bottoms with parchment rounds.
2.In a small bowl,whisk together the cocoa powder and hot water until smooth.Set aside to cool.
3.In a medium bowl,using a wire whisk,stir together the flour,ground almonds,baking powder,baking soda and salt until well blended.
4.In another large bowl,using a whisk beat the butter,3 tablespoon of sugar until light and fluffy.Add the egg yolks,one at a time,beating well after each addition.Beat in vanilla and almond extracts.
5.In to this wet mixture now combine the dry ingredients one-half at a time,alternating them with the cocoa mixture.Divide the batter evenly between the prepared baking pans.
6.In a clean,grease free glass bowl,beat the egg whites and the remaining 2 tablespoon of dark brown sugar until the mixture looks creamy ,continue beating until the egg white mixture forms a stiff,shiny meringue.Takes about 5-6 minutes.
7.Using a small spatula,swirl the meringue over the cake batter in the pans,making sure that meringue completely covers the batter and extends to the sides of the pans.Evenly distribute the sliced almonds over the meringue.
8.Bake the cakes until the meringue is puffed up and lightly browned about 25-30 minutes.Run the tip of a sharp knife between the edge of the meringue and the sides of the cake pans to loosen the cakes.Transfer to a wire rack and let cool completely.

Assemble the cake
When the cakes are cooled completely,peel off the parchment paper from the bottom of the cake and immediately invert the cake on to a serving platter;the meringue side will be facing up.Spoon the chocolate filling on top of the meringue.Spread it out evenly.Do the same for the other cake from the pan,place over the chocolate filling,meringue side up.


The Cake is my entry for Divya Kudua's Best Chocolate Cake Event

Tuesday, March 2, 2010

Cocoa Barley Bites


Change is the only thing constant in my cooking.Remember these Energy bites? I recreate the same recipe with change of ingredients for these tasty snack time bites, Barley flour and cocoa instead of wheat flour and a different sweetener and fat.Barley flour imparts soft and crumbly texture ,the cocoa and bitter sweet chocolate chips add an intense chocolate smack to the bites.
This particular barley flour purchased from the local Indian store had the fibrous look and feel,can also be seen in the end result of baking these bites.Barley flour is also available in other specialty stores.Its rich in protein and fiber but not free of gluten.


Recipe : Cocoa Barley Bites
Makes about 15 bites, 1 1/2 inch each.
Ingredients
1 1/2 cup Barley flour
2 heaping tablespoon unsweetened cocoa powder
1/4 cup dried fruits(raisins,cherries,cranberries or others)
2 tablespoon (about 1 ounce) bitter sweet chocolate chips(with at least 60% cocoa)
1 1/2 tablespoon Virgin pressed coconut oil(can also use Pure ghee)
2 tablespoon Agave nectar or Pure Honey
2 tablespoon water
pinch of salt

Method
In a mixing bowl,combine the flour,cocoa powder,dried fruit and chocolate chips.In another container melt the coconut oil or ghee in microwave oven or on stove top,stir in the sweetener(agave nectar or honey).Combine this wet mixture in the flour mixture,add the water and using hands bring the mixture together.The mixture does not feel like the cookie dough,its much dense and easy to work with hands.Take about a tablespoon of mixture each time and shape round and flat.Lay on a baking sheet.

Bake at 325F for 12-15 minutes.Let cool on rack.Serve with reduced fat milk on side.Taste best the same day.Can be store in air tight container for 2-3 days.

Saturday, February 27, 2010

Fruity Tiramisu


Among the top fantasy desserts,words can't describe this Italian delicacy.Spongy biscuits soaked in coffee,layered between delicate,light and fluffy creamy goodness and sprinkle of cocoa,tiramisu is heaven in every bite.

Thanks to the lovely hostesses(Aparna and Deeba) of the month, who made the excellent choice.I was overwhelmed to make(bake) it from scratch,after all that is the challenge of being a daring baker.While I was very satisfied with the result of this baking adventure,my sister and her family who visited, driving in winter ,despite all the odds,were overjoyed to feast on it.

So when, where and how was tiramisu born?
Tiramisu is said to have its origins in Treviso (Italy), and there are quite a few stories about how it came to be created.
One story traces the tiramisu as far back as the Renaissance claiming that it was first made in honour of the visit of Grand Duke Cosimo di Medici to Tuscany. Yet another one points to the tiramisu being an adaptation of the "Zuppa Inglese" referring to the sponge cake and cream layered English Trifle.
However, experts in this area generally agree that the tiramisu as we know it today, was born in the ‘70s.Some believe that the Tiramisu was created in the the Le Beccherie (a restaurant in Treviso). Ohters suggest that Tiramisu was first made in 1971 by an Italian baker named Carminantonio Iannaccone in a small bakery in Treviso, Italy.

The February 2010 Daring Bakers’ challenge was hosted by Aparna of My Diverse Kitchen and Deeba of Passionate About Baking. They chose Tiramisu as the challenge for the month. Their challenge recipe is based on recipes from The Washington Post, Cordon Bleu at Home and Baking Obsession.


The Lady finger biscuits light and spongy are easy to make ,as long you are good at whipping up a fluffy meringue.I don't do alcohol,the flavors are essentially coffee and cocoa.The homemade mascaporne cheese was not at all complicated like most other cheeses I tried making.Another change for dietary reasons,is light cream with no Zabaione or pastry cream,the cream mixture is just sweet mascaporne and whipped cream.For the extra fruity look to the dessert,garnish the slices of tiramisu with wild blueberries,fresh sliced pineapples and kiwis or any other fruit in season.Can also layer the fruit over the biscuits before spreading the cream.

Alcohol-free Tiramisu with Eggless Cream
Recipe adapted from 1000 Italian Recipes by Michele Scicolone:
Serves 6
Ingredients:
18-20 savoiardi/ ladyfinger biscuits(Recipe follows)
1 1/2 cups/350ml brewed espresso, warmed
1/2 cup/110gms sugar
8 oz/226gms Mascarpone cheese(Recipe follows)
16 oz/473ml chilled Organic heavy whipping cream
1/2 teaspoon/ 2.5ml vanilla extract
2 tablespoons/30gms unsweetened cocoa powder

Method:
Pour the whipping cream into the bowl and whip at high speed for about 4 minutes or till the cream forms soft peaks when the mixer is lifted up.

In another bowl, whisk together the mascarpone and sugar till smooth. Add 1/3rd of the whipped cream to the mascarpone mixture and fold it in gently. Carefully fold in the remaining cream as well.

Assemble the tiramisu:
Have ready a rectangular serving dish (8x8 inches).Mix together the warm espresso, and sugar in a shallow dish, whisking to mix well. Set aside to cool.
Workings quickly, dip 12 of the ladyfingers in the sweetened espresso, about 1 second per side. They should be moist but not soggy. Immediately transfer each ladyfinger to the platter, placing them side by side in a single row. You may break a lady finger into two, if necessary, to ensure the base of your dish is completely covered.
Spoon one-third of the cream mixture on top of the ladyfingers, then use a rubber spatula or spreading knife to cover the top evenly, all the way to the edges.
Repeat to create 2 more layers, using 12 ladyfingers and the cream mixture for each layer. Clean any spilled cream mixture; cover carefully with plastic wrap and refrigerate the tiramisu overnight.
To serve, carefully remove the plastic wrap and sprinkle the tiramisu with cocoa powder using a fine-mesh strainer or decorate as you please. Cut into individual portions and serve.


MASCARPONE CHEESE
(Source: Vera’s Recipe for Homemade Mascarpone Cheese)
Makes 12oz/ 340gm of mascarpone cheese
Ingredients:
474ml (approx. 500ml)/ 2 cups Organic whipping cream(36 %), pasteurized (not ultra-pasteurized
1 tablespoon fresh lemon juice
Method:Bring 1 inch of water to a boil in a wide skillet. Reduce the heat to medium-low so the water is barely simmering. Pour the cream into a medium heat-resistant bowl, then place the bowl into the skillet. Heat the cream, stirring often, to 190 F. If you do not have a thermometer, wait until small bubbles keep trying to push up to the surface.
It will take about 15 minutes of delicate heating. Add the lemon juice and continue heating the mixture, stirring gently, until the cream curdles. Do not expect the same action as you see during ricotta cheese making. All that the whipping cream will do is become thicker, like a well-done crème anglaise. It will cover a back of your wooden spoon thickly. You will see just a few clear whey streaks when you stir. Remove the bowl from the water and let cool for about 20 minutes. Meanwhile, line a sieve with four layers of dampened cheesecloth and set it over a bowl. Transfer the mixture into the lined sieve. Do not squeeze the cheese in the cheesecloth or press on its surface (be patient, it will firm up after refrigeration time). Once cooled completely, cover with plastic wrap and refrigerate (in the sieve) overnight or up to 24 hours.
Vera’s notes: The first time I made mascarpone I had all doubts if it’d been cooked enough, because of its custard-like texture. Have no fear, it will firm up beautifully in the fridge, and will yet remain lusciously creamy.
Keep refrigerated and use within 3 to 4 days.

LADYFINGERS/ SAVOIARDI BISCUITS
(Source: Recipe from Cordon Bleu At Home)

This recipe makes approximately 24 big ladyfingers or 45 small (2 1/2" to 3" long) ladyfingers.
Ingredients:
3 Organic eggs, separated
6 tablespoons /75gms granulated sugar
3/4 cup/95gms cake flour, sifted (or 3/4 cup all purpose flour + 2 tbsp corn starch)

Method: Preheat your oven to 350 F (175 C) degrees, then lightly brush 2 baking sheets with oil or softened butter and line with parchment paper.
Beat the egg whites using a hand held electric mixer until stiff peaks form. Gradually add granulate sugar and continue beating until the egg whites become stiff again, glossy and smooth.
In a small bowl, beat the egg yolks lightly with a fork and fold them into the meringue, using a wooden spoon. Sift the flour over this mixture and fold gently until just mixed. It is important to fold very gently and not overdo the folding. Otherwise the batter would deflate and lose volume resulting in ladyfingers which are flat and not spongy.
Fit a pastry bag with a plain tip (or just snip the end off; you could also use a Ziploc bag) and fill with the batter. Pipe the batter into 5" long and 3/4" wide strips leaving about 1" space in between the strips.
Hold the parchment paper in place with your thumb and lift one side of the baking sheet and gently tap it on the work surface to remove excess sprinkled sugar.
Bake the ladyfingers for 10 minutes, then rotate the sheets and bake for another 5 minutes or so until the puff up, turn lightly golden brown and are still soft.
Allow them to cool slightly on the sheets for about 5 minutes and then remove the ladyfingers from the baking sheet with a metal spatula while still hot, and cool on a rack.
Store them in an airtight container till required. They should keep for 2 to 3 weeks.


healthywithfood Copyright © 2012 -- Powered by Blogger